Thursday, April 26, 2012

Ice Cream Truck & Treble Clef Jewelry

The Ice cream truck tutorial features Strawberry Shortcake, Neapolitan Ice Cream Sandwich, Bomb pop, Orange Creamsicle or Orangesicle, and a Vanilla Sundae Cone....all charms of course:D


Now on to the Treble Clef earring and necklace set!

Watch the videos to see how to make your own:) I used 20 guage wire from Michael's to make the earrings and necklace. I made the gold chain from supplies I got at Hobby Lobby.

Enjoy!
XOXO,
Toni

Wednesday, April 25, 2012

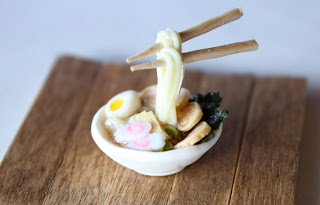
Floating Ramen Ring & Dango

The ramen is actually floating!!!

The tutorial is uploading here as I type:)

I turned the ramen bowl into a ring by just gluing it to a ring base I got from Hobby Lobby.


It was so much fun to make!

Enjoy & I hope you make your own.

XOXO,
Toni


Saturday, April 21, 2012

Cold Stone Creamery: Waffle Bowl Sundaes


W A F F L E     B O W L S :
1. Mix tan/ecru, translucent, yellow and a brown.
2. Make the waffle pattern with this funky tool...I got it from hobby lobby in a pack with other clay tools. Or you can use you're own waffle pattern:)
3.Cut it into a circle ( I'm using a cookie cutter that I found in hobby lobby in the clay section...it came in a green package)
4. Fold the waffle over any circular object (like a thick marker) and pinch.
5. Dust the waffle bowl with yellow ochre, orange, and brown chalk to make it look "cooked."
6. Bake the bowl for about 15 minutes at 275 degrees Fahrenheit.


German Chökolätekäke:
1. ICE CREAM: Brown FIMO clay
2. COCONUT: Translucent White PREMO
3. HOT FUDGE: Fimo Deko Gel + Brown & Black chalk pastels. *** If you dont have any deko gel just use dark brown paint (oil or acrylic)
4. BROWNIES: Layer brown and black clay, and cut into small cubes. Texture the edges of the brownie for a realistic look.


Mint Chocolate Chip:
1. Mix mint green clay with chocolate chips (bake a small piece of brown clay, then chop it up into pieces to make the chips)
2. Place the hot fudge mixture, or dark brown paint around the top of the bowl.


Strawberry Blonde:
1. Mix light pink clay with strawberry chunks (make like the chocolate chips only red)
2. STRAWBERRIES: Premo Red
3. STRAWBERRY SAUCE: Fimo Deko Gel mixed with red chalk . ***If you don't have any Deko Gel just use red paint.


Chocolate Chip Cookie Dough:
1. ICE CREAM: Mix Ivory (Sculpey) clay with brown chocolate chips.
2. CARAMEL: Mix brown, orange, and yellow chalk with FIMO Deko Gel.
3.COOKIE DOUGH: Mix Ecru & chocolate chip pieces.


Birthday Cake:
1. ICE CREAM: White clay (FIMO)
2. Rainbow sprinkles
3. Brownies pieces made the same as in the German Chocolate Cake

BAKING INSTRUCTIONS:_________
Once you've finished making the sundaes bake them for 20 minutes at 275 degrees Fahrenheit. You can also turn these into rings by gluing them to ring bases.

Also, tonight a friend and I are going to a concert that I've been anticipating for weeks:D


Enjoy!
XOXO,
Toni

Wednesday, April 18, 2012

Pinkberry Frozen Yogurt Charms

 
I finally went a Pinkberry in Atlanta (Buckhead), and I have to say it is the best frozen yogurt I have ever had! All of the fruit is fresh & they have great topping choices:D

Thus, I was inspired to create these charms.

I used a #14 star shaped cake decorating tip to give the frozen yogurt it's "swirly" look. You can use a pen or the end of a paintbrush to push the clay through the tip.


ORIGINAL + FRUIT :
1. Frozen Yogurt: Pluffy Polymer Clay White
2. **KIWI FRUIT TUTORIALS**

http://www.youtube.com/watch?v=UjsgbILIp-I

http://www.youtube.com/watch?v=_DmvcLJt8mQ

3. Pineapple: FIMO Sunflower
4. Strawberries: PREMO


POMEGRANATE +  WATERMELON
1. Pomegranate Frozen Yogurt: Pluffy Hot Pink
2. Watermelon: PREMO Translucent Red
3. Waffle Cookie (Waffle Pattern Tool from Hobby Lobby): Translucent & Tan or PREMO Ecru
***Be sure to bake the cookie before adding it to the frozen yogurt***


GREEN TEA + BLUEBERRIES
1. Pluffy Tropical Green
2. PREMO Navy Blue


CHOCOLATE
1. FIMO Brown
2. Graham Crackers: Translucent & Tan or PREMO Ecru
***Be sure to bake the graham crackers before adding them to the frozen yogurt***


ORIGINAL + FRUITY PEBBLES
1. Pluffy white
2. FIMO sunflower (Yellow)
3. FIMO Orange
4. PREMO Red
5. PREMO Turquoise
6. PREMO Wasabi (Green)

BAKING INSTRUCTIONS
Once you've finished making the frozen yogurt charms, add eye-pins and bake them for 20 minutes at 275 degrees Fahrenheit.
Enjoy!
XOXO,
Toni

Friday, April 13, 2012

Gillyweed : Harry Potter Potion Ep. # 7


So it's time for Harry Potter again! And this one is Gillyweed. A plant similar to seaweed that will allow a wizard to grow gills, webbing fingers, and toes.

Being the Harry Potter lover that I am, I have to admit I never thought of doing this one, but it was requested several times. So I rummaged through my craft room and came up with this. I am in love with this necklace although it needs to be on a much longer chain. It looks amazing in person, and I'm completely surprised at the result! In person it reminds me of a terrarium/aquarium.

Also, I photographed this right before I took my little sister & cousin to the fair. They saw the necklace and forced me to let them participate, so I let my cousin photograph, and my sister model....i.e. the girl pictured is not me:)

M A T E R I A L S:

1. Miniature Bottles / Corked Vials ( Jim Holtz Ideology Michael's Craft Store)
2. Elmer's Clear Glue
3. Yellow & Green Food Coloring
4. Lichen (From Hobby Lobby) or Grass from your backyard
5. Miniature Rocks (Hobby Lobby)
6. Mixing Cup
7. Toothpick
8. Wire Cutters or Nail Clippers
9. 20 Gauge wire
10. Round Nose Pliers
11. Jump Ring
12. Necklace
13. Strong Glue (E600)

 Well enjoy & watch the video on my Youtube page if you'd like to make your own!


XOXO,
Toni

Confetti Cake


I was in the mood to make a confetti cake, so here it is!

I made the cake slices in to charms, and I'm thinking about making the cake into a ring:)

I made the sprinkles by rolling out tiny "snakes" of different colors of polymer clay, and then cutting them into small pieces. I usually bake the snakes, then cut the sprinkles, but I wanted to try something different this time. I'm pretty pleased with the result.

M A T E R I A L S:

CAKE COLORS:
    1. Translucent (Premo)
    2. White (Katoclay)
    3. Yellow (FIMO)
    4. Tan / Ecru (Premo)

CONFETTI & SPRINKLES:
    1. Pink (FIMO)
    2. Turquoise (PREMO)
    3. Red (Sculpey)
    4. Yellow (FIMO)
    5. Orange (FIMO)
    6. Green / Green Translucent (Premo)

FROSTING:
    1. White Katoclay
    2. White Liquid Polyclay (Hobby Lobby)
    ******You can also use water if you don't have liquid clay:)


XOXO, 
Toni


Sunday, April 8, 2012

Wolfsbane: Harry Potter Potion Ep. # 6


Ashlynbebe (from YouTube) requested specifically that I do a blue Wolfsbane potion with smoke that glows in the dark. At first I had little intention of doing it because I had no idea how I would or could create an effect like that, but I stumbled upon a stash of fabric paint I had from literally 8 YEARS AGO! I am not making this up!

I found the bag of about 15 colors a few weeks ago and added them to my crafting supplies with no ideas of how to use them.

Yesterday, I was actually about to go purchase a new bottle of Glow-In-The-Dark fabric paint. But then I thought about that forgotten stash, went searching through it, and found the almost empty bottle!

I felt so resourceful:)


M A T E R I A L S:

  • Miniature Bottles: Michael's Craft Store
  • Clear Elmer's Glue: Joann's Fabric
  • Tulip Glow-In-The-Dark Fabric Paint: Wal-Mart
  • E600 (Glue): Hobby Lobby
  • Blue Food Coloring: Wal-Mart
  • Miniature Label: I printed it out very small, then cut out the words and used a lighter to burn the edges of the label. Please be careful it you're going to do the same!


So try it for yourself, and have fun!
XOXO,
Toni

Friday, April 6, 2012

Antique Pink Rose Ring


I actually planned on making something else for Easter, but I failed. So instead I made this ring, and I'm in love with it. I've never tried to color roses with chalk before and I'm really happy with the result.

I made the ring using Ivory colored polymer clay, and used hot pink chalk to give the edges some color. I baked the ring for about 30 minutes at 275 degrees Fahrenheit. I glued the rose to a ring base that I got from Hobby Lobby. If you don't have you're own ring base just make you're own using polymer clay. So have fun making your own and wear it this Easter weekend.

Enjoy!
XOXO,
Toni

Thursday, April 5, 2012

Afternoon Tea


A miniature cup of tea & two fruit tarts. Own of my favorite necklaces that I own has this miniature Dutch Delft teacup on it as a charm. I love it because it's so tiny and delicate.

I  U S E D: 
  • Miniature Dutch Delft Tea Cup (Ebay)
    FIMO Deko Gel (Ebay): Be sure to bake the FIMO Deko Gel, and you can use resin as a substitute if you don't have any on hand.
  • Chalk (Hobby Lobby): Brown & Yellow
  • Tart Clay Colors: Translucent, White, Ecru
  • Kiwi Fruit Cane
  • Strawberry Fruit Cane
  • Cherries: Translucent Red Polymer Clay 


Enjoy!
XOXO,
Toni


Felix Felicis : Harry Potter Potion Ep. # 5


"It's liquid luck. It makes you lucky!"
- Hermione Granger

So we're at potion #5 and it Felix Felicis! A potion that is also called liquid luck.

I made mine into a necklace, but of course you can turn yours into a key chain, or a charm.


I   U S E D :

  • Gold Polymer Clay (FIMO)
  • TLS (Translucent Liquid Sculpey)
  • Needle Tool
  • Miniature Bottle (Hobby Lobby)
  • Miniature Label : The same as before...I typed the words "Felix Felicis" out very small and added a mini Hogwart's Crest to the label. I then burned the edges with a lighter for an aged look.
  • E600 (Glue)
  • Jump Ring (Hobby Lobby)
  • Necklace (Hobby Lobby)


Have Fun & Enjoy!
XOXO,
Toni 

Wednesday, April 4, 2012

Tacos, Chips & Salsa


A miniature Mexican feast. One of my favorite meals...miniaturized. It's pretty simple & was really fun to make. I made the tacos with headpins so they could be turned into earrings.


I   U S E D :

Tortilla Color:  Yellow (FIMO), Translucent (PREMO), Ecru (PREMO)

Beef: Chocolate Brown (FIMO)

Lettuce: Leaf Green (SCULPEY), Yellow, & Translucent

Tomatoes: Translucent Red (PREMO)

Cheese: Sweet Potato (SCULPEY)

I purchased the plates from Ebay, and I made the red & white gingham tray with fabric, glue & a wooden board.

Have Fun!
XOXO,
Toni

Butterbeer : Harry Potter Potion Ep. # 4

Ok..another non-potion, but still fun. I made this one using the same clear Elmer's glue as I used in the Lumos "episode." I mixed the glue with yellow, brown, & white chalk for the color, and did it vigorously enough so there would be bubbles (or froth) at the top:)

I   U S E D :

Color Chalk (From Hobby Lobby, but you can also get them from Wal-Mart) : Brown, Yellow, & White

20 Gauge Gold wire & A gold jumpring

Pliers

Clear Elmer's Glue (From Joann's Fabric)

Miniature Bottle (From Michael's)

Miniature Butterbeer Label :
I did a Google image search for a Butterbeer label, and came a cross this one with a Hogwart's Crest. I don't remember the site, or else I would link it here, but I'm sure you can find the same one with a little persistence though. Make it very small, and print out a few so you can have some extras, and make them in a few sizes in case one is too small or too large.

I'll be uploading another video right after this one:)

As always have fun!
XOXO,
Toni

Tuesday, April 3, 2012

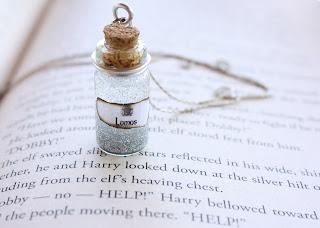
Lumos : Harry Potter Potion Ep. # 3


Potion #3 isn't actually a potion, it's a spell called Lumos. It creates light at the end of the caster's wand!


M A T E R I A L S :

Bottle : Ideology - Michael's

E600 Glue (To glue on the cork top)

Elmer's Clear Glue (To fill the bottle & To replace the resin)

Martha Stewart Glitter in STERLING & CRYSTAL FINE

20 Gauge wire : I wrapped the wire around the neck of the bottle about two full times, then tuned the end into an "eye-pin." This is a great solution for bottles that don't have eye-pins going through the top/cork.

Miniature "Lumos" Label : I typed out the word lumos in a word document (in very small font) & added a little Hogwarts Crest to the top. I then cut out the label & burned the edges with a lighter. Be careful with this part because the label will burn quickly!

Have fun!
XOXO,
Toni

Monday, April 2, 2012

Starbucks Coffee & Drinks


There are about five drinks that I order at Starbucks, and I've made them into charms. I'm eventually going to make the French Roast Coffee cup into a necklace and layer it with a few other of my favorite necklaces:D


C O L O R S    I     U S E D :
Strawberries & Cream Frappuccino : Red FIMO, Translucent, & White

Coffee : White, Dark Brown

Lemonade : FIMO Glow-In-The-Dark & FIMO Translucent White (For the Ice)

Mocha Frappuccino : Ecru, & Brown 

Green Tea Frappuccino : Translucent Green & White


S T R A W S :
I rolled out a strip of green clay, and baked it. Then I cut then into small (1/2 inch) strips to place in each drink. Use a needle to make a hole for the straw to be placed in. I secured the straws with Translucent Liquid Sculpey, but you can also use a strong glue.


M I N I    S T A R B U C K S    L O G O :
To make the miniature Starbucks logo, I did a simple Google image search for a "starbucks logo," then copied it into a word document & made it small enough to fit on a miniature cup. I had to try a few sizes before I found one that was the right size.


W H I P P E D    C R E A M :
I used Pluffy clay in white for the whipped cream & a #14 star cake decorating tip. I put some of the Pluffy into the tip, and used the end of a paintbrush to push out the clay. I then added it to the top of the drink, and used Translucent Liquid Sculpey for extra strength.

If you have a question post it as a comment, or email me @ ilyatoni@gmail.com.

XOXO,
Toni

Starbucks Tutorial Below: